Building an homelab — Part I
Spare hardware, Raspberry Pis, servers and mini PCs. What are they? Is it a shopping list? Well, no. These are things that IT enthusiasts usually use to set up a homelab.
Homelabs are made to address different needs and/or purposes. They can be a place to learn and experiment new topics or a safe environment to spin up self-hosted services. Some common use cases are:
- Build a private cloud to store your files
- Build your own streaming platform (for educational purposes 👀)
- Build an ephemeral playground for a specific topic
Building a homelab can be as simple as spinning up few Docker containers on a given machine, or as complex as setting up a multi-node Kubernetes cluster. It can also be cheap, using spare hardware, or expensive, buying new hardware to use.
You decide.
Why do I build a homelab?#
In my case, I’m building it to explore a few topics a bit more, such as:
- System administration
- Self-hosting some services
- A bit of home automation
- Experiment new topics
I would like to get better at system administration, container devlopment, and orchestration. I would also like to run a small, low-power Kubernetes cluster at home to host some services, such as Home Assistant, Prometheus, Grafana, and so on.
Is this overkill? Maybe.
I think of it as a big, long truck delivering a small package, but a Homelab also gives me the right amount of fun as I get my hands dirty with cables, boards, configurations and so on!
Homelab topology#
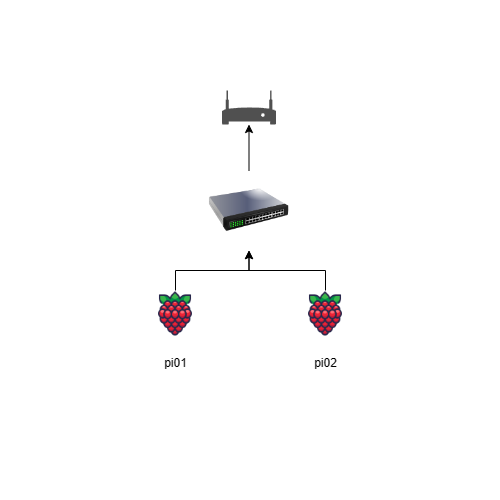
As I said before, reusing spare hardware can be a good way to start with a homelab. Actually, my homelab will consist of:
- 2x Raspberry Pi 4 8GB
- TP-Link Switch
Currently, the only “spare” hardware being used is the switch, while the Raspberry Pis are brand new. I’ve decided to start this simple homelab with just a few nodes and see how it develops.
Preparation#
There are a few steps you can take to configure the Raspberry Pis and give them a fixed IP so that they will always have the same IP, even if they are rebooted for some reason. This can be done in three different ways:
- The first method is to update the modem’s DHCP subnet mask, which is normally set to /24, and this means that the modem can assign any IP in the range 192.168.1.1 - 192.168.1.254 (almost the whole subnet!). We can lower this subnet from /24 to /25, which will allow the modem to assign any IP in the range 192.168.1.1-192.168.1.127. This approach leaves us with a bunch of free IPs in the range 192.168.1.129 - 192.168.1.254 (that’s a lot!).
- Another way to achieve the same result is to update the modem’s DHCP range instead of the subnet mask. With this method, you can keep the default /24 as the subnet mask, but you can define both the DHCP range start and the DHCP range end by setting them to 192.168.1.2-192.168.1.210, this way you will be able to use any IP from 192.168.1.211-192.168.1.254. Again, you will have plenty of free IPs to use for your homelab.
- Then we have the simplest way to get a fixed IP for our servers: this method consists of updating the modem’s DHCP settings, telling it that a machine with a given MAC address (e.g. 2a-a2-44-6b-0b-4a) will get a fixed (or static) IP (e.g. 192.168.1.211). In this way, we still leave the whole subnet to the modem’s DHCP, but we ensure that a certain number of IPs are reserved for our servers.
At this stage, it doesn’t matter which method is used to make it work. I decided to use 192.168.1.211 for the first Pi and 192.168.1.212 for the second.
Once the modem’s DHCP setting had been updated, I proceeded to flash the SD cards used to boot my Raspberry Pis. I had to struggle a bit with this step, not because it’s difficult, but because my Raspberry Pis decided to reject the Raspberry Pi OS / Raspberry Pi OS Lite images. That said, after several tries I decided to go for the Ubuntu Server image. I used the Raspberry Pi Imager, selected the Ubuntu Server 64-bit image and customised the installation by providing the user to create with the password, hostname and network IP to set on the board.
Verification#
Now that both SD cards have been written, it’s time to boot up the Raspberry Pis and verify that they are running Ubuntu Server correctly with the IP I set during the image flash.
Let’s connect to the first board using both the user and the IP set during the SD card flash:
PS C:\Users\imgios> ssh imgios@pi01
imgios@pi01's password:
imgios@pi01:~$ lsb_release -a
No LSB modules are available.
Distributor ID: Ubuntu
Description:    Ubuntu 23.10
Release:        23.10
Codename:       mantic
imgios@pi01:~$ ip a | grep 192.168
    inet 192.168.1.211/24 metric 600 brd 192.168.1.255 scope global dynamic wlan0
I’m able to access the card with both the user and password set during the image flash. I also saw that the card had the correct IP and the hostname pi01.
Let’s check the same thing on the second board:
PS C:\Users\imgios> ssh imgios@pi02
imgios@pi02's password:
imgios@pi02:~$ lsb_release -a
No LSB modules are available.
Distributor ID: Ubuntu
Description:    Ubuntu 23.10
Release:        23.10
Codename:       mantic
imgios@pi02:~$ ip a | grep 192.168
    inet 192.168.1.212/24 metric 600 brd 192.168.1.255 scope global dynamic wlan0
Conclusion#
The first part is done. At this stage it was more like the “analysis and design” phase of the little homelab, deciding what hardware to use and how to configure the network. I also included a bit of preparation, basically the DHCP configuration and the Raspberry Pis SD card flash, showing which IP was being used and which OS I’d chosen. For some reason, both my boards refused to work with Raspberry Pi OS / Raspberry Pi OS Lite images, but I know people who use them without any problems. So please do not assume that they do not work, it was just my bad luck!
I’ve decided to split the adventure into two separate posts, and in the next one I’ll share how I got Kubernetes up and running on the boards, with some basic monitoring using Prometheus and Grafana.
Feel free to contact me if you want to discuss this or have any questions by creating an issue in the following repository: imgios/imgios